For Review
You will perform a stable solo exit. Set up your position for the best launch that will present the front of your hips to the relative wind. Exit in a neutral position with your legs slightly extended for better stability. Maintain your arch as the relative wind changes from ahead to below after exit. As always, you can recover from exit and freefall instability by using HAALR, AIR, and the roll-out-of-bed technique.
New Stuff
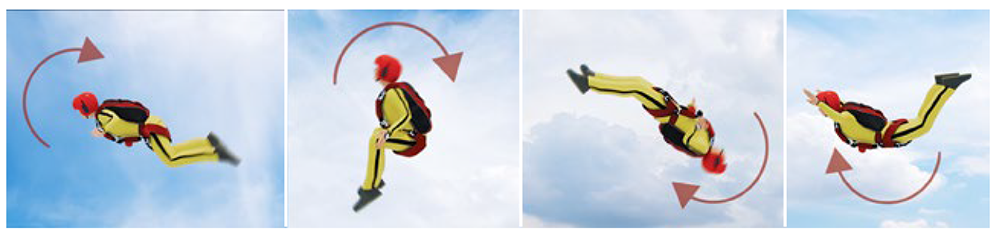
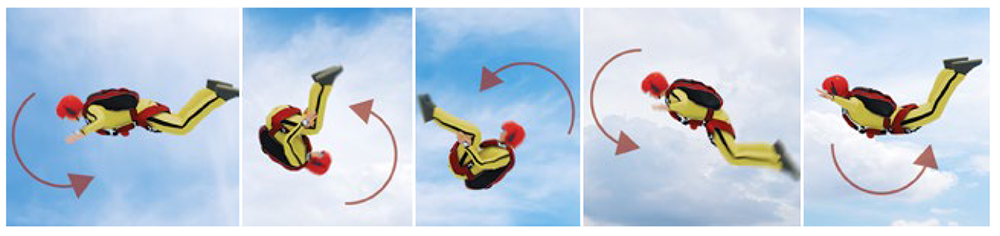
In Category E, you will purposely experiment outside of the neutral stable position by performing barrel rolls, back loops, and front loops. When you recover from any two of these within 5 seconds, you qualify for self-supervision in freefall. The BSRs state: “All students must jump under the direct supervision of an appropriately rated USPA Instructor until demonstrating stability and heading control prior to and within 5 seconds after initiating two intentional disorienting maneuvers involving a back-to-earth presentation.” (Chapter 2-1.G.4)
Being cleared for self-supervision indicates that an instructor authorizes you to jump without direct oversight. However, an instructor or coach will still supervise your pre-jump preparations and must give you a gear check before boarding the aircraft. It is your responsibility to check your gear before you exit but it is highly recommended to do a mutual gear check with an experienced jumper before exiting. (see Chapter 4-4.A)
An analog altimeter may read high when it is in your burble during inverted positions such as loops and barrel rolls, so you may be lower than the altimeter indicates.
Barrel roll
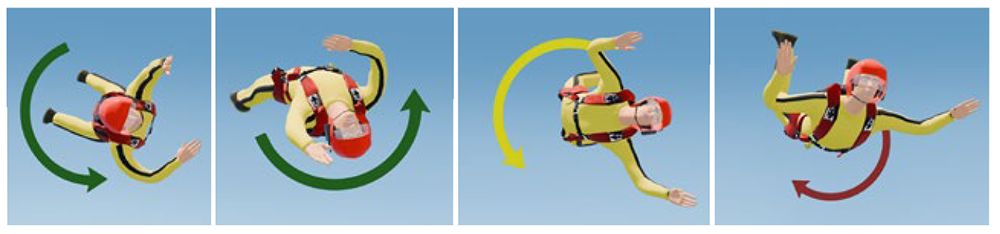
The barrel roll is a fun maneuver, as well as the best technique for returning to a belly-to-earth position. Start the barrel roll in a neutral body position. Become narrow by bringing your knees together and stretching both arms out in front of your head. Keep your eyes on the horizon. Aggressively drive one arm across your chest in a punching motion to create momentum. Create a scissoring action with your arms and legs to twist around the imaginary axis that runs from your head to your feet. Recover by returning to the neutral body position. Relax and check your altimeter.
Back loops
The back loop is a dynamic maneuver that challenges you to use your entire body. Start the back loop by bringing your knees up into a sitting position. Stretch your arms out to the side and widen your leg stance. Next, push your legs out and look back in the direction of the loop. Keep your head back as you roll over until you see the horizon. Recover by returning to the neutral body position. Relax and check your altimeter.
Front loops
The front loop is also a dynamic maneuver that requires more aggressive action at the beginning and end. Start the front loop by forcefully bending at the waist while throwing your head forward toward your knees and tucking your legs in. Hold this position until you feel the wind in your face again. Recover by throwing your knees back out and returning to the neutral body position. Relax and check your altimeter.
For Review
Before you meet with your instructor for your training, you can check ground winds and winds aloft and construct your flight plan so you’re ready to discuss it.
Review your traffic avoidance procedures: watch for other canopy traffic, especially upon entering the landing pattern. The most dangerous point of the pattern occurs when two jumpers who are flying in opposite directions on their base legs turn to final approach. The lower canopy has the right of way, but one jumper should not maneuver to assert right of way over another. It takes two people to have a collision, but only one to avoid it.
New Stuff
Stalls
A stall is an aero dynamic event where the wing loses its ability to produce lift. When a ram-air parachute stalls, it also loses pressurization, and the canopy will no longer be able to support the weight of the jumper. To avoid stalling close to the ground in a flare, you should know the stall point on any canopy you jump, especially if the canopy is new to you. For this reason, you need to perform all stall practice above your 2,500-foot decision altitude.
Too much input or input applied too abruptly using either the toggles or the rear risers can cause a stall. Applying too much input is associated with a slow-speed stall, where the canopy loses airspeed and eventually stalls. Applying input too abruptly is associated with a high-speed stall, where the stall occurs more suddenly and at a higher airspeed.
Before intentionally stalling with toggles, make sure your canopy is in full flight and flying straight. Slowly pull the toggles down to full arm extension until you feel the onset of the stall, a feeling similar to rocking back in a chair and falling backward. After holding the toggles all the way down for 5 to 6 seconds, the stall will develop further, and the canopy will become bowtie shaped. The air will leave the canopy, and you will begin descending at a high rate. Some student canopies are configured to prevent a toggle stall, so your canopy may not develop a full one. Recover from a fully developed toggle stall by slowly raising the toggles up a few inches until the canopy inflates and returns to slow flight. Avoid raising the toggles too quickly, which can cause the canopy to surge, dive, or spin into line twists.
Stalling using the rear risers works similarly, except that you need to pull down only 5 or 6 inches on both risers. For now, you will practice only toggle stalls; your B-license canopy training addresses rear-riser stalls.
Adjusting the Pattern for Accuracy
Following a predictable, well-planned landing pattern helps maintain safe traffic flow, reduces the risk of canopy collisions, and improves your accuracy on landing. Improving your accuracy increases your options for safe landing areas and lowers your stress in case you need to land off the drop zone.
To refine your accuracy, make small adjustments to your pattern checkpoints over a series of jumps. First, plan your checkpoints and target for your first jump of the series. Based on where you landed on that jump, have your instructor make a suggestion on adjusting one or more of your checkpoints: the pattern entry point, the entry point to the base leg, or the entry point to your final approach. They may have you adjust either the altitude or the landmark of these checkpoints. Make your next jump in similar wind conditions with this adjustment. Keep repeating this process to refine your accuracy for those wind conditions. Record your checkpoints and wind conditions in your logbook in order to track your progress.
Flare techniques
Effective flare techniques vary depending on the design and size of a parachute, but the basics of flaring apply to any technique. You can refine your flare technique by expanding on the basics using the following strategies:
Being in the PLF position for landing allows you to maintain your heading and stay level in your harness during the landing flare. Except for small corrections on final approach, keep your toggles all the way up, in full glide, for 8 to 10 seconds before starting your flare. This will help the canopy produce more lift when you flare. Keep your chin level, looking at the point mid-way to the horizon, to better judge the flare height. Start the flare when your feet reach an altitude of approximately twice your height above the ground. Flare with your hands close to your body, bringing your elbows back as your hands come down. Continue to push your hands evenly down the side of your thighs to full arm extension. It is important to fully finish your flare. Finish with your feet approximately 1 to 3 feet above the ground. Hold the flare all the way down during a PLF or for a few steps after touch down.
Two common flare techniques are the continuous flare and the staged flare. Most larger canopies, those 220 square feet or more, flare effectively with either technique.
The continuous flare is one smooth motion that should take about the same time that it takes to count to five. You may count slower or faster depending on wind conditions or your sight picture. Regardless of the speed of your flare, you should time it to be smooth and consistent overall, responding to how your canopy is performing.
The staged flare consists of points where you may pause during the flare stroke. The flare your instructor taught you may have two, three, or even more stages. Many canopies flare most effectively using a two-stage flare. The first stage of this two-stage flare is called the sweet spot, the point where your wing is level and the nose of your canopy is directly above you. Find this sweet spot by adjusting the speed and depth of the first stage of your flare.
To find the sweet spot for the first stage of your flare, practice at a safe altitude in your holding area. Start with a medium-speed input and bring the toggles down to where your hands are even with your chest strap—this gives you a solid baseline. On each practice flare, adjust the speed or depth slightly to see how your canopy reacts. The goal is to pendulum smoothly forward under the canopy until the nose is directly above you. Pay attention to your hand position so you can repeat what works during your actual landing. Once you reach this point in your flare, pause and assess your height above the ground. Start the second stage of this two-stage flare when you are at the proper height to smoothly and fully finish the flare with your feet approximately 1 to 3 feet above the ground.
Your instructor will determine the best flare technique for your canopy and practice with you for the landing on your next jump. You will practice finding the sweet spot above 2,500 feet on your next jump, even if you use a continuous flare for landing.

Two Open Canopies
You will review detailed procedures for having two canopies out with your instructor, expanding on your first-jump-course knowledge by looking at the guidance in Chapter 4: Recommendations for Everyone. A two-canopies-out malfunction can be caused by your AAD firing if you fail to deploy at the planned deployment altitude or by deploying your reserve without cutting away if you are below your 1,000-foot cutaway hard deck.
Procedures for High-Wind Landings
Winds can change from the time you leave the plane to when you are under canopy. If you land in high winds, PLF and then pull one toggle all the way in as quickly as possible until the canopy collapses. You risk injury when being dragged after landing in high winds. When you land and the canopy is dragging you and you cannot collapse it, disconnect your RSL, if possible, and cut away.
Your canopy may dive or collapse behind any obstacle that generates turbulence. Thus, if landing in high winds, plan your final approach and choose a landing spot with the least potential for turbulence and the greatest distance between you and any obstacle.
Open-Parachute Orientation
If you have not already been involved in packing, you should begin packing lessons in this category. A rigger or instructor will expand on your knowledge of the parachute system by slowly opening a packed rig, highlighting how your parachute ideally deploys in a specific order. A malfunction happens when the deployment is delayed, halted, or happens out of sequence. You should identify your rig’s components, their functions during deployment, and how malfunctions might happen.
Potential Malfunctions
- lost or unrecoverable deployment handle
- hard pull
- pack closure
- pilot-chute hesitation
- pilot chute in tow
- premature deployment (hand deploy)
- pilot-chute entanglement
- bag lock
- streamer
- line over
- fabric or line failure sufficient to interfere with control and flare
- slider hang-up
- control-line entanglement
Components
- pilot chute, bridle, and collapsing system
- deployment bag
- pilot-chute attachment
- top skin, bottom skin, ribs, and crossports
- nose and tail (leading and trailing edges)
- stabilizers and slider stops
- A, B, C, D, and brake lines
- line cascades, including brake lines
- slider and slider grommets
- connector links and link protectors
- risers and toggles
- AAD
- standard RSL or MARD
RSL and MARD
A reserve static line (RSL) is a back-up safety device meant to automatically deploy the reserve canopy following a cutaway. On an RSL-equipped rig, one end of the RSL lanyard attaches to a main riser, and then the lanyard runs to the reserve ripcord cable, where the other end attaches. When the main risers depart following a cutaway, the RSL lanyard pulls the reserve pin and releases the reserve pilot chute, which deploys the reserve parachute. When the RSL includes a Main-Assisted Reserve Deployment (MARD) device, the RSL lanyard hooks to the reserve-pilot-chute bridle, which allows the departing main parachute to assist in extracting the reserve, speeding up its deployment. RSLs help to both ensure and speed up reserve deployment when fractions of a second matter; MARDS speed up the deployment even further. (See Chapter 4-3: Equipment for more details.)
USPA requires all students to use an RSL and recommends that all experienced jumpers use an RSL with a MARD. The RSL must be attached and routed correctly to function properly.
According to the BSRs (Chapter 2-1 H), students are limited to jumping when surface winds are 14 mph or less. An S&TA may file a waiver for students to jump in higher winds. Licensed jumpers have no established wind limit, so they must exercise good judgment.
FAR 91.107 establishes that you must wear a seat belt during taxi, takeoff, and landing. Drop zones establish their own policies regarding the altitude at which you may remove your seat belt.
Review aircraft EPs from Category A. In an aircraft emergency, you can choose one of these actions: land in the plane, exit on your reserve, or exit on your main parachute. When choosing which action is appropriate, consider your drop zone’s policy on the altitude at which you take off your seat belt. If an aircraft emergency occurs below that altitude, land in the plane. Further, consider your decision altitude when choosing when you use your main rather than your reserve. If an aircraft emergency occurs above seat-belt-off altitude and below your decision altitude, use your reserve.
Spotting, Winds Aloft, Opening and Exit Points, Exit Separation, and SPACE
Previously, you learned that spotting is the process of selecting an exit point while accounting for the effect of winds aloft in freefall and during your canopy flight. The exit point is known as “the spot.” You will take a more active role in spotting by calculating the spot and participating during jump run. Determining the spot involves multiple steps, which include obtaining the winds-aloft information, calculating the effect of wind on your canopy flight and calculating your freefall drift.
Finding the Winds Aloft
Accurately determining the spot will allow you to arrive at your pattern-entry point at 900 feet. Ground winds are often not the same as winds at higher altitudes. Winds aloft cause jumpers to drift across the ground both when in freefall and under canopy. You must account for winds aloft to determine your ideal exit and opening points.
Use an app recommended by your instructor to find a winds-aloft report, which might look like this:
The data provided includes the altitude in feet above the ground (AGL), a heading in degrees indicating where the winds are coming from, and the wind speed in either mph or knots. You can convert knots to mph by multiplying by 1.15. Degrees are expressed as a position on a compass:
Keep in mind that the winds-aloft report is only a forecast and can differ from what you actually experience. To assess the accuracy of the forecasted winds, observe other jumpers’ opening points and canopy flights from the ground. Ask them about their flights and how the winds aloft affected their canopy flights.
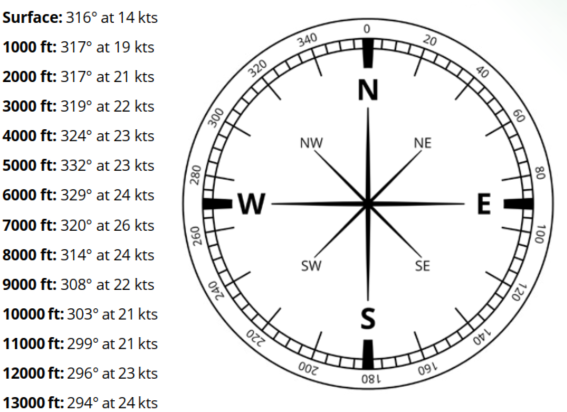
Sample Winds-Aloft Report and Compass Headings
Determining Opening Point
Using the winds-aloft report, first consider the effect of winds during canopy descent. A student canopy descends at approximately 1,000 feet per minute. We can convert the strength of the wind in miles per hour to distance drifted per minute by dividing by 60, like this:
|
AVERAGE WIND IN MILES PER HOUR
|
DISTANCE PER MINUTE (in miles)
|
|
60
|
1
|
|
30
|
1/2
|
|
20
|
1/3
|
|
15
|
1/4
|
|
10
|
1/6
|
|
5
|
1/12
|
To determine the opening point, start by calculating how many minutes you will spend under canopy from opening point to pattern-entry point.
For example, at a descent rate of 1,000 feet per minute, if you are open at 3,000 feet, your time from opening to pattern entry at 900 feet would be approximately two minutes.
Now, average the winds-aloft report for altitudes from 3,000 feet AGL to 1,000 feet AGL.
For example, if the reported winds aloft were:
1,000 ft: 260° at 10 mph
2,000 ft: 270° at 15 mph
3,000 ft: 280° at 20 mph
The average would be 270° at 15 mph.
To determine the distance of your drift from 3,000 feet to the pattern-entry point, find the average wind speed in the first column, multiply the distance per minute column by two minutes under canopy.
|
AVERAGE WIND IN MILES PER HOUR
|
DISTANCE PER MINUTE (in miles)
|
Example: DRIFT FROM 3,000 feet to 900-foot pattern entry.(approximately 2 minutes)
|
|
60
|
1
|
2 miles
|
|
30
|
1/2
|
1 mile
|
|
20
|
1/3
|
2/3 mile
|
|
15
|
1/4
|
1/2 mile
|
|
10
|
1/6
|
1/3 mile
|
|
5
|
1/12
|
1/6 mile
|
According to the above chart, from 3,000 feet to the pattern entry point, this 15-mph average translates to a ½ mile of drift. The direction 270° is wind from the west. Thus, the ideal opening point would be 1/2 mile to the west of the entry point of your landing pattern. Use an aerial map to determine a landmark at this calculated opening point. You can use your runway as a ruler to estimate the distance from your opening point to your pattern-entry point by converting your runway’s length to miles.
Determining Exit Point
After calculating the ideal opening point, which is the ideal spot to open your canopy, calculate the exit point, which is the ideal spot to leave the plane. This requires adding the drift experienced in freefall to the drift experienced under canopy.
Start by computing your time in freefall, where the first 1,000 feet takes approximately 10 seconds and each 1,000 feet after that takes approximately 5 seconds.
The example below uses 1 minute of freefall.
|
AVERAGE WINDS IN MILES PER HOUR
|
DISTANCE PER MINUTE (in miles)
|
|
60
|
1
|
|
30
|
1/2
|
|
20
|
1/3
|
|
15
|
1/4
|
|
10
|
1/6
|
|
5
|
1/12
|
Now, determine the average winds aloft during freefall. If the reported winds aloft were:
3,000 ft: 280° at 20 mph
6,000 ft: 290° at 27 mph
9,000 ft: 270° at 31 mph
12,000 ft: 240° at 42 mph
The average would be 270° at 30 mph.
According to the above chart, from 12,000 feet to 3,000 feet, this 30-mph average translates to a freefall drift of 1/2 mile in one minute of freefall. The direction 270° is wind from the west. Add this freefall drift distance on top of the opening point of 1/2 mile west, so the ideal exit point would be one mile to the west.
Participating in Jump Run
Establish what communication with the pilot you might use for spotting corrections or the go-ahead to open the door and jump. Commonly, jumpers use verbal or physical communication like hand signals, shoulder taps, or yelling “door!” for smaller aircraft, and electronic (e.g., spotting buttons) and lights for larger aircraft. Regardless, the pilot determines when the door may be opened and may prefer to operate the door.
Clearing your SPACE
Using the acronym SPACE can help you quickly remember what to look for while clearing your airspace before exiting.
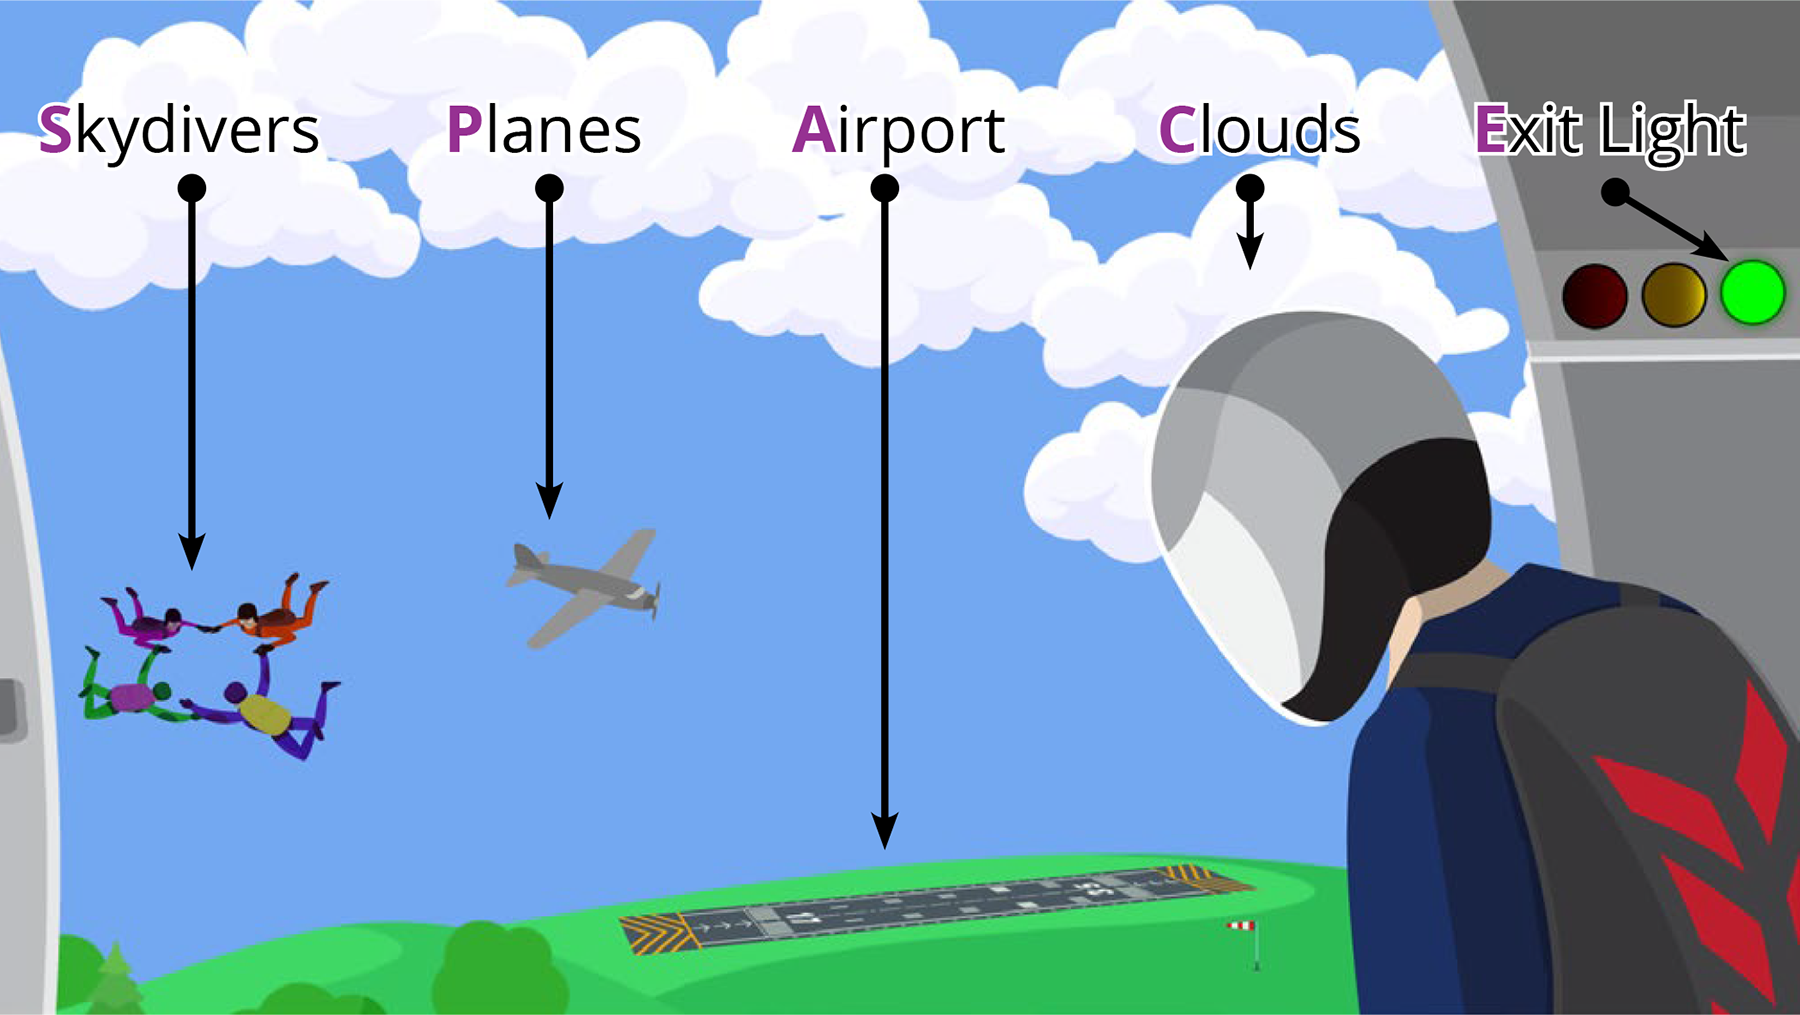
Skydivers
Exit separation between groups of skydivers is a critical part of clearing the space on exit and can change according to winds at altitude, size of the groups, and the skydiving disciplines they are engaging in. Generally, the stronger the winds aloft, the more time between groups is needed for proper exit separation. Chapter 4-7 explains how to determine the time between exiting groups.
Planes
According to FAR 105.5, the jumper and the pilot are jointly responsible for making sure the space is clear of other planes before jumping.
Airport
Make sure you see the airport in the space below you and orient it to the direction of jump run. Ensure it is in the expected location based on your previously determined exit point.
Clouds
The FAA prohibits skydiving through or near clouds. Make sure the distance between clouds is sufficient according to what you learned in Category D.
Exit Light
In larger aircraft, wait for the green light to exit. In smaller aircraft, confirm with your pilot. At any time during jump run, the pilot may have to remove their OK for the jump due to traffic, instructions from air traffic control, or other reasons.