Solo Exit
In this category, you will perform a solo exit, achieving stability within 5 seconds. Remember tools to maintain control and stability, including HAALR and AIR.
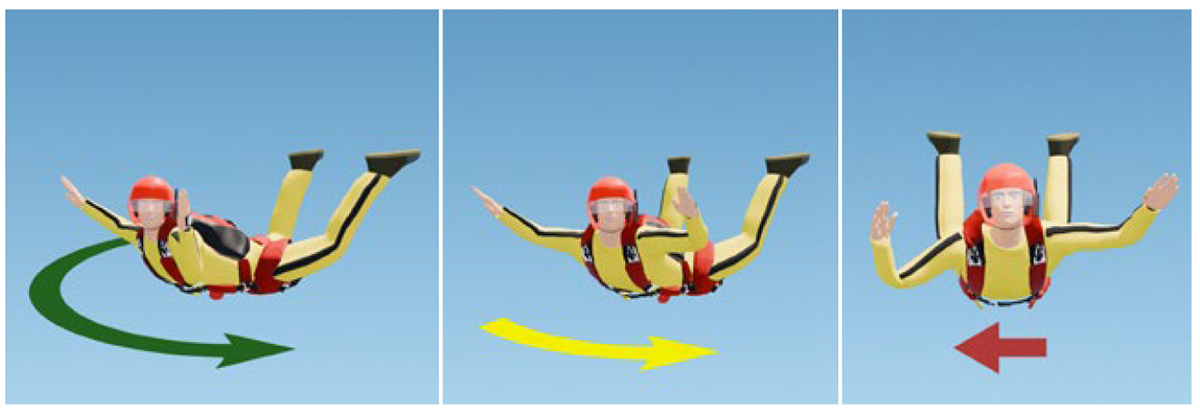
Freefall Turns
To turn in freefall, first establish a comfortable, relaxed, neutral body position. Find a point ahead on the horizon as a primary heading reference. Use the start-coast-stop (SCS) technique to control your turn. Turns should begin from a neutral body position. Maintain symmetry in your arms and legs, a straight spine, and level shoulders. Breathe, relax, and initiate the turn:
Start by pressing one elbow down from the shoulder joint only. Press your arm down no more than 45 degrees. Maintain a neutral leg position during the turn.
Coast in the turn by returning to neutral before your desired heading comes into view. Your momentum will continue to turn you while you are neutral, much like your car continues to go forward after taking your foot off the accelerator. During the coast, assess your speed and the distance to your desired heading to determine when you should begin your stop movement.
Stop by countering the turn in the opposite direction, then return to a neutral body position.
If you go past your intended heading or encounter other difficulties, use HAALR and pick a new heading before starting another turn. Stop all maneuvers by 6,000 feet.
Rear-Riser Steering
Rear-Riser Steering
Learning to use your rear risers gives you more options to control your canopy. The rear risers operate the back half of your canopy, and steering with them with your brakes still stowed is the fastest way to change heading right after opening. Rear-riser steering is the first of several Canopy-Flight Emergency Procedures (CEPs) you will learn, because it can be useful for avoiding a canopy collision right after opening.
To steer with your rear risers, reach up and grab them firmly above where the toggles are stowed. Look in the direction you want to turn, check for traffic, and pull that riser down 4 to 6 inches. Once you have unstowed your toggles, keep them in your hands while performing rear-riser maneuvers.
In this category, you will perform 90-degree rear-riser turns after visually inspecting your canopy but before you unstow your toggles. You will perform them again with your toggles unstowed. Stop all rear-riser steering practice by 2,000 feet.
Accuracy
Flying a predictable pattern and arriving at pattern checkpoints at the proper altitude improves your chances of landing where you planned. Being accurate on landing builds your confidence in case you ever land off the drop zone. With the help of your instructor, use the forecasted ground and winds aloft to choose your pattern entry point, checkpoints, and target. A checkpoint includes both an altitude and a landmark.
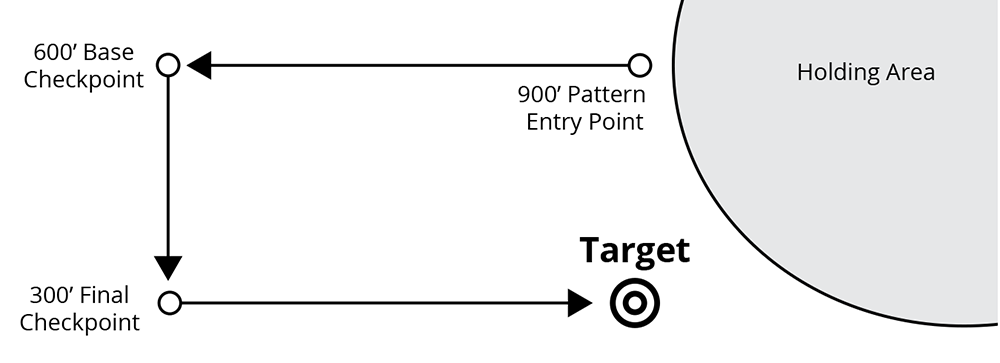
Before your jump, identify your target and draw a 165-foot (50-meter) radius circle around it on the aerial map. Use an interactive online map to help estimate the distance. Land within that area with minimal radio assistance and record the distance from the target in your logbook.
You will review canopy problems and malfunctions in the training harness to help you develop quicker recognition of malfunctions and improve your decision-making ability, especially as your assigned pull altitude lowers as you gain experience. The canopy must reliably fly straight, turn, and flare. Decide if your canopy is safe to land by the 2,500-foot decision altitude and execute your emergency procedures if necessary.
You should be able to describe procedures for landing on a building:If landing on a roof, flare and PLF. Once you’ve landed, disconnect the RSL, if able, and cut away. If landing your reserve, contain it. Wait for help. If hitting a building broadside, turn the canopy slightly to avoid a direct impact before flaring. Prepare to PLF, flare to slow down, and attempt to strike a glancing blow.
AAD Operation
You will learn how to turn on your automatic activation device. Different brands of AADs have different operational modes that affect the firing altitude and speed. The owner’s manual contains more information.
Conducting Gear Checks
You should perform four gear checks supervised by your instructor before every jump.
- Check your gear before putting it on (pre-flight)
- Check your gear immediately after putting it on
- Check your gear before loading the plane
- Check your gear before exiting the plane
As you make more jumps, you will start taking more responsibility for your gear checks. The “check of threes” is a self-check commonly used for the pre-boarding and pre-exit gear checks. They include:
- three-ring assembly and reserve static line (three rings)
- three points of harness attachment for snap assembly and correct routing and adjustment (three straps)
- three operation handles—main activation, cutaway, reserve (three handles)
Additionally, you should have another jumper check your pins on the back of the system from top to bottom:
- AAD on and set to correct mode
- reserve pin in place; cable moves freely
- main pin in place
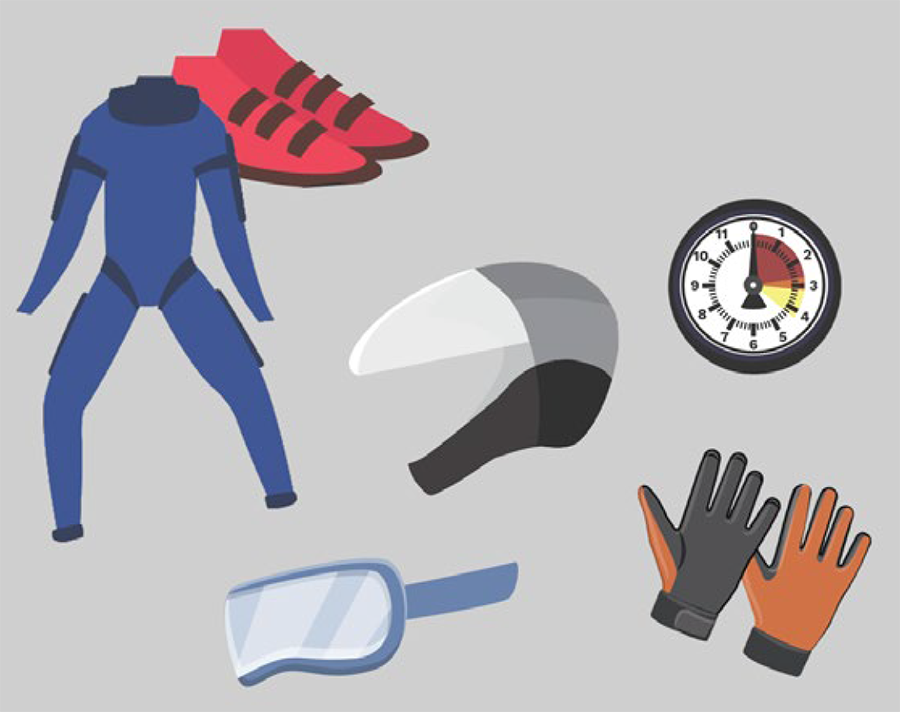
Your personal equipment check includes SHAGG:
Shoes—tied, no hooks
Helmet—fit and adjustment and buckled
Altimeter—set for zero
Goggles—tight and clean
Gloves—lightweight and proper size (below 40 degrees F)
Requirements
All student jumps, including tandems, must be completed between official sunrise and sunset according to the BSRs (Chapter 2-1.G.9).
You must maintain vertical and horizontal separation from clouds while jumping. FAR 105.17 lists the FAA’s cloud clearance and visibility minimums for skydivers. You must be able to apply these requirements to your jumps, as the FAA places joint responsibility for cloud clearance and visibility on the jumper and the pilot.
The altitudes are given in mean sea level, or MSL, which is your true altitude using sea level as zero. Pilots use MSL to allow for consistent application of altitude requirements regardless of a location’s elevation. The elevation is the altitude of a given location, like your drop zone, at ground level. Above ground level, or AGL, refers to your height above the ground. Using AGL allows for better understanding of your actual reference to the ground.
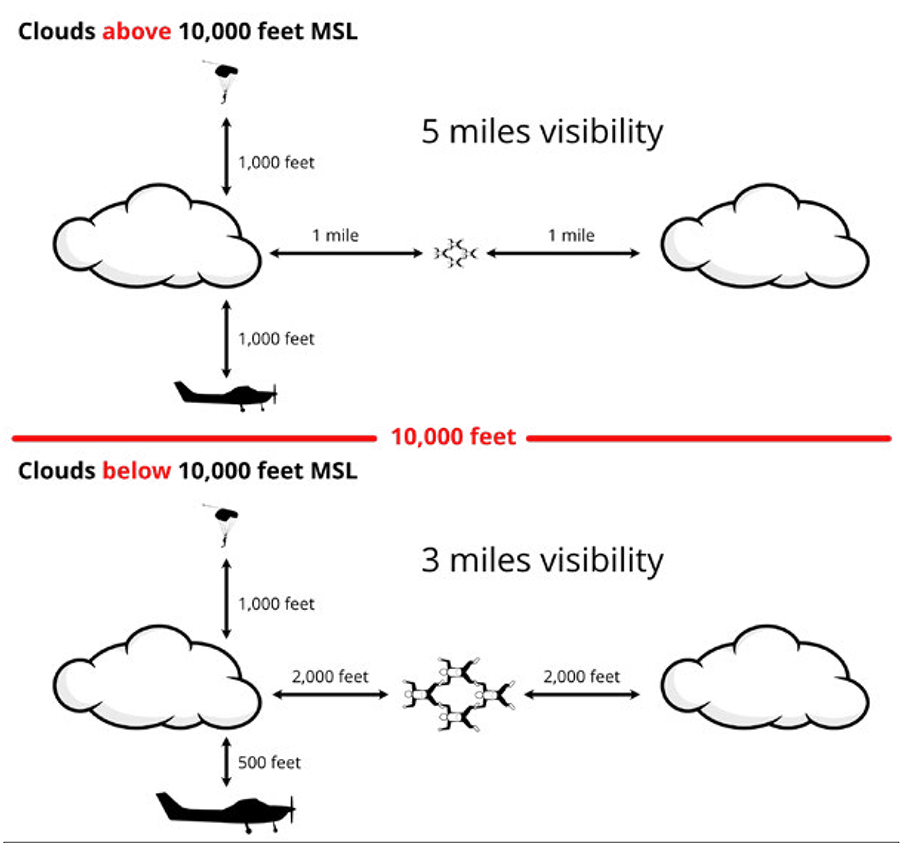
Visual representation of FAR 105.17: Cloud clearances above and below 10,000 ft.
Spotting, Wind Drift, and Opening Point
You must determine the ground winds and winds aloft before every skydive according to the BSRs (Chapter 2-1.K). Having this information can help you plan your canopy flight and landing pattern. You can obtain current wind information from various weather apps. Ask your instructor which apps provide the most accurate information for your drop zone. The apps provide the direction and strength of the wind at ground level and at various altitudes in either miles per hour or knots. The description of winds includes their direction of origin expressed as a compass heading such as, “The ground winds are from two-seventy degrees.” In this example, the winds are blowing from the west. Thus, your planned landing pattern will have the final approach going west, facing into the wind for landing.
To land on the drop zone, you must be able to determine the spot on the ground over which to exit the plane and know how to find that spot while on jump run in the aircraft. Jump run is the predetermined path the aircraft flies prior to exit. Your exit point is the point at which you exit the plane. The direction of jump run is determined by the strength and direction of the winds aloft. The stronger the winds aloft, the farther the exit point will be from the landing area. The wind pushes you during freefall from the exit point toward the landing area. This horizontal movement is known as wind drift. The winds, presence of clouds, the size of your group and your jump type, planned deployment altitude, and many other factors all go into determining your ideal exit point.
Spotting is the term for selecting an exit point while accounting for the effect of winds aloft in freefall and during canopy flight. The exit point is also known as the spot. Spotting starts with determining the best opening point for canopies, which is the ground point of reference over which you open your parachute. This point is determined from wind forecasts for different altitudes. The stronger the wind is at the exit altitude and during freefall, the farther upwind of the holding and landing area the exit point, or spot, will be. This is also true for the canopy opening point, as it alsoshould be upwind of your holding and landing area. If you open upwind of your holding area, the wind will help you get there.
The pilot, instructors, and drop zone staff determine the direction of jump run and the location of the spot based upon the forecasted and observed winds. The direction of jump run and the location of the spot may change throughout the day as the weather and winds change.
The first step in learning to spot is determining what is “straight down” and predicting how the plane is moving across the ground. First, look straight out at the horizon and draw an imaginary line back to you. Then look forward toward where you are headed and draw an imaginary line back to you. The junction of the two perpendicular lines from the horizon marks the point straight below the aircraft. Before exiting, you must also verify that the area below you is clear of clouds and aircraft, and to do so effectively, you must get your head completely outside the aircraft.
You will observe your instructor’s spotting procedures, and then you will demonstrate the technique for looking straight down from the aircraft during jump run. You should be able to determine whether the aircraft is on the intended jump run and when you are at your desired exit point.

Estimating Freefall Time
You can note your freefall time in your logbook based on your exit altitude by assuming an average terminal velocity of 120 mph. The first 1,000 feet of your freefall takes approximately 10 seconds as you reach terminal velocity. Each 1,000 feet after that takes approximately 5 seconds. For example: You exit the airplane at 5,000 feet and deploy your canopy at 3,000 feet. The first 1,000 feet takes 10 seconds, and the next 1,000 feet takes 5 seconds. You can log 15 seconds of freefall time.