The Academics section of each category includes information on exit and freefall, canopy flight, emergency procedures, equipment, and standard operating procedures. Some of this information will review what you learned earlier, while some will be new and build on that foundation.
Review the exit procedures from Category A. For AFF students, your exit will be the same. IAD and static-line students perform the climb-out with little or no assistance from the instructor and release from the plane promptly on the exit command. Tandem students climb into position after the instructor’s OK, check with the instructor once in position, and initiate the exit count.
During this category, you will improve your overall awareness and stability, reinforce muscle memory for your pull, and work on leg awareness and heading.
Repeat this drill to establish and maintain awareness, stability, and control. First, recognize your heading to confirm you are not turning. Know your altitude.
IAD and static-line students: Know your exit altitude and count to keep track of time after release from the aircraft.
Tandem and AFF students: Make sure you check your altimeter. Check your arch, making sure your hips are forward a little. Check your legs; most beginners need to extend their legs a little and point their toes. Relax … how? Breathe consciously, a full breath in and out, to release tension. Use this HAALR technique just before and after releasing from the aircraft.
Main Deployment
Tandem and AFF students: Perform practice deployments in freefall until you can perform them smoothly and are comfortable with locating the deployment handle. At your assigned pull altitude, wave off to signal deployment, then pull at the correct altitude without prompting from the instructor.
IAD and static-line students: Practice stable deployment within 5 seconds of exit. You must complete three jumps in a row with successful simulated deployments before moving to the solo freefall starting in Category C.
Leg Awareness
You can practice and improve your leg awareness by learning how to move forward in freefall. To move forward, extend your legs with your toes pointed while keeping your arms in a neutral position. Extending your legs from the neutral position adds more drag in the back, lifting your lower body to the relative wind. This off-level attitude causes you to move forward. It is less noticeable on a tandem jump. To practice in freefall, extend your legs smoothly and hold for three seconds, then relax your legs to neutral.
IAD and static-line students: Increase your leg awareness during the exit set-up and after release from the plane. You can accomplish this with a little mental preparation on exit.
Maintaining a Heading
Staying stationary is key to having control. Relax in a neutral body position and find a point ahead on the horizon as a heading reference.
Tandem and AFF students: Your instructor may teach you team turns, which are intentional freefall turns you perform together. You will be able to use this skill to maintain your freefall heading in Category C.
For Review
In your first-jump course you learned to prevent canopy collisions by always clearing your airspace both before and during any turn. Simply look in the direction of the turn both horizontally and below before you make the turn.
Review the wind direction and speed with your instructor. You’ll develop your descent strategy, that is, determine the expected opening point and prepare your canopy flight plan. After opening and performing your canopy check, check your altitude, determine your position relative to the drop zone, and then monitor canopy traffic. Locate the holding area and establish your path to your 900-foot pattern-entry point. Fly directly to your holding area. Fly to the pattern-entry point and fly the planned pattern using downwind, base, and final-approach legs with checkpoints. Flare and PLF.
More about canopy traffic in the pattern: It is important to fly predictably so that canopies behind you in the pattern can determine your flight path and remain sufficiently separated from you. You do this by flying your pattern, staying in your lane and flying a straight final approach.
New Stuff
Crabbing
Under canopy, wind speed and direction affect your ground track and ground speed when running, holding, or experiencing crosswind drift.
Ground track is the actual path you travel over the ground determined by the direction your canopy is facing and wind effects.
Ground speed is the actual speed you travel across the ground determined by your canopy’s air speed and wind effects.
Running refers to flying your canopy directly with the wind at your back. This increases your ground speed.
Holding refers to flying your canopy directly into the wind. This decreases your ground speed.
Crosswind drift happens when the wind pushes your canopy from the side, causing your ground track to differ from the direction you are facing. This can cause you to drift off of your desired course.
Crabbing is a technique you can use to correct crosswind drift and put your ground track back on your desired course. You do this by angling into the wind, using an appropriate wind correction angle to get your ground track to match your desired course.
Flight Cycle
A flight cycle is the parachute’s response during the period of time between an input and the parachute’s return to stabilized full flight. It is important to understand how a flight cycle is created so that you can avoid entering one close to the ground just before landing. Flaring for landing is a one-way street, meaning you can stop pulling down the toggles at any point during the flare stroke if you started it too high, but you cannot go back up.
Any input to a canopy, such as turning or pulling down the toggles and letting them back up, initiates a flight cycle. The flight cycle is a normal and predictable flight characteristic of all parachutes. When a flight cycle occurs, the parachute dives, its speed increases beyond that of full flight, and the jumper swings back behind the parachute. The parachute then slows down as the jumper swings forward under the parachute and it returns to full flight.
Experiencing a flight cycle up high can be fun. However, a flight cycle just before or during a flare is dangerous because the parachute dives forward and picks up speed, and the effectiveness of the flare is greatly reduced. This is why the proper response to a flare initiated too high is to stop and hold whenever you realize it is too high, then finish the flare forcefully when closer to the ground.
Review the correct responses to a premature deployment in the aircraft: Attempt to contain the open parachute and inform the instructor. If your parachute goes out the door, follow immediately to prevent damage to the plane and injury to yourself or others. If anyone else’s parachute goes out the door, immediately push them to and through the door for the same reason.
Review Pull Priorities:

Review deployment problems and correct responses.
IAD and static-line students: this may be new to you.
Make no more than two attempts or take no longer than 5 seconds, whichever comes first, before initiating emergency procedures.
- Premature container opening in freefall: Attempt to locate and deploy the pilot chute first. If you can’t locate the pilot chute after two tries or 5 seconds, or if deploying the pilot chute results in a partial malfunction, cut away and deploy the reserve.
- Lost deployment handle: Place your hand on the side of the container and slide it down to the bottom corner. Find the pilot chute and deploy. If you cannot find the pilot chute after two tries or 5 seconds, initiate emergency procedures.
- Hard pull: Place your elbow against the container for leverage. If you cannot throw the pilot chute after two tries or 5 seconds, initiate emergency procedures.
- Pilot-chute hesitation: Modify the airflow by twisting slightly while looking over your right shoulder. If that doesn’t work, repeat over your left shoulder. If the pilot chute does not launch after two tries or 5 seconds, initiate emergency procedures.
Static-line students: Your instructor will review the student-in-tow procedures, which are: Arch and signal to your instructor that you are ready for them to cut your static line. After the static line is cut, deploy your reserve.
Remember these critical altitudes: You must decide to cut away by 2,500 feet and then act immediately. Also, if you find yourself below 1,000 feet without a functioning canopy, deploy the reserve without cutting away.
With your instructor, practice in the training harness to recognize and respond to problems and malfunctions using guidance from Category A—Academics in the first-jump-course topics.

For Review
Review how to retrieve your parachute after landing.
For Review
Minimal and careful movement in the aircraft helps protect your gear from a premature container opening.
New Stuff
If you are a tandem student, your progression in the tandem method ends with Category B, and you will transition to a different method by attending a solo-equipment first-jump course in order to continue on to Category C.
Student wind limits are 14 mph, waiverable by your S&TA, according to the BSRs (Chapter 2-1.H).
The minimum required deployment altitude for students and USPA A-License holders is 3,000 feet (Chapter 2-1.I ).
At airports, normal flight practices separate aircraft traffic from parachute traffic, but you need to respect runways and aircraft landing patterns. Your instructor will explain your drop zone’s policies about avoiding runways while flying your canopy and after you’ve landed.
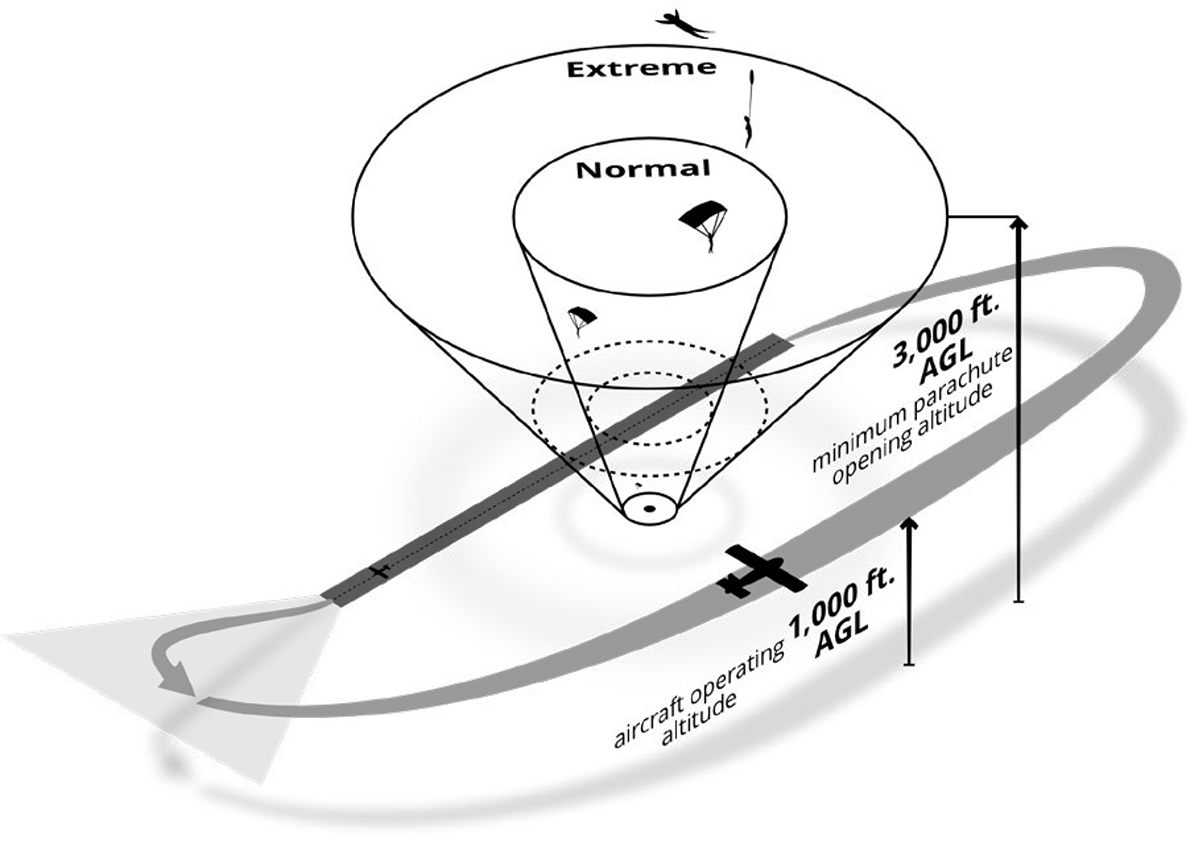
Aircraft and Parachute Traffic