Academics
Category B: Learning and Performance Objectives
- relaxing in the skydiving environment
- heading awareness
- parachute deployment
- more on the landing pattern
- written flight plan
- airport orientation
- protecting handles
- equipment emergency review
A. Exit & Freefall
- Student-led exit (all students)
- Review the exit set-up from Category A.
- IAD and static-line students perform the climbout with little or no assistance from the instructor and exit promptly on the “Go!” command.
- Tandem students climb into position after the instructor’s OK, check with the instructor once in position, and initiate the exit count.
- Altitude awareness to recognize and act at the assigned pull altitude is the most important task in freefall.
- “Altitude, arch, legs, relax:” Repeat to establish and maintain awareness, stability, and control.
- Know your altitude (static line students know their exit altitude and count to keep track of time after release from the aircraft).
- Check your arch (hips forward a little).
- Check your legs (most beginners need to extend their legs a little and point their toes).
- Relax
- Breathe consciously to release tension.
- Use this technique just before and after releasing from the aircraft.
- Deployment
- AFF and tandem students
- Practice deployment in freefall until smooth and comfortable with locating the deployment handle.
- Wave-off to signal deployment.
- Pull at the correct altitude without prompting from the instructor.
- IAD and static-line students practice deployment within five seconds of exit (three successful jumps in a row required before solo freefall).
- Leg awareness
- AFF and tandem students practice leg awareness by extending legs while arms remain in a neutral position.
- Extending the legs from the neutral position adds more drag in the back, lifting your lower body.
- The off-level attitude causes you to slide forward on the deflected air (less noticeable in tandem droguefall).
- Hold the position for three seconds and return to neutral to cancel the effect.
- Finish all maneuvers 1,000 feet above wave-off altitude or 6,000 feet, whichever comes first.
- IAD and static-line students increase leg awareness during the exit set-up and after release from the plane.
- Maintaining a heading
- First, relax into a comfortable, relaxed, neutral body position.
- Find a point ahead on the horizon as a heading reference.
- If turns are trained and performed (AFF and tandem):
Note: Although not required, team turns—like relaxation—may aid a student in preventing turns on later jumps.
- The student turns 90-degrees in one direction.
- The student turns back to the original heading.
- Check the altitude.
- Repeat in the opposite direction if time permits.
- If the student does not initiate the turn, the instructor(s) may turn the student.
B. Canopy
- Clearing airspace: both before and during any turn, look in the direction of the turn.
- Using a DZ photo or taking a walk in the field, you’ll preview with an instructor the expected opening point and prepare a written flight plan together.
- Review the descent strategy:
- Determine position and altitude upon opening.
- Locate the target and establish a line to the pre-planned 1,000-foot pattern entry point.
- Divide the line logically according to the remaining altitude (halfway down, halfway back); for example, if open at 4,000 feet—
- Divide the line in half and remain over the first half of the line until 2,000 feet.
- Fly over the remaining half of the line until reaching the pre-planned pattern entry point at 1,000 feet.
- Fly to the instructor-assigned pattern entry at 1,000 feet, as identified on the written flight plan.
- Fly the pre-planned pattern using downwind, base, and final approach legs, with specific points to overfly at specified altitudes.
- Fly a straight-in final approach without S-turns (S-turns present a hazard to other traffic).
- Flare at ten feet, based on Category A experience.
Note: Flaring is covered in more detail in Categories C and F.
- Review the PLF and its value to protect against a hard landing.
C. Emergency Procedure Review
Note: After completing the solo first-jump course, tandem students should review this section each day before making any jump in Category C. This section also serves as a review outline for any jumper undergoing general review following a period of inactivity.
- Deploy at the correct altitude, regardless of stability.
- Review common problems at the training harness (tandem students may review while under canopy):
- correct response to line twist:
- Spread the risers and kick to untwist, but release the brakes only after clearing the twist.
- If spinning, twist the risers to untwist the lines and stabilize canopy, then kick to untwist the risers.
- By 2,500 feet, be sure line twist can be corrected at a safe altitude, or initiate emergency procedures.
- slider up:
- Bring both toggles to the bottom of the stroke to slow the canopy and pump at the bottom of the control range.
- Alternatively, pump the back risers.
- The slider needs to be at least halfway down for landing.
- Repeat remedial procedures twice or until reaching the decide-and-act altitude of 2,500 feet.
- end-cell closure:
- Pull both toggles to the bottom of the stroke and hold them until the end cells open, then release them smoothly.
- Alternatively, hold down both back risers.
- If the end cells can’t be cleared, evaluate controllability and flare before reaching the decide-and-act altitude of 2,500 feet.
- If the canopy has opened normally but turns on its own, be sure both brakes are released.
- Evaluate controllability and flare before reaching the decide-and-act altitude of 2,500 feet for:
- Broken steering line: Use back risers.
- Broken suspension line(s)
- Pilot chute entangles with canopy or lines.
- Damage: Canopy rips or tears.
- Review deployment problems for manual activation (introduction for IAD and static-line students).
- Make only two attempts to correct the problem before initiating reserve procedures.
- lost deployment handle:
- Hip or chest handle location: Follow harness webbing for two seconds only.
- Bottom of container location: Sweep bottom of container, then side of container to corner for two seconds only.
- hard pull:
- Hip or chest handle location: Try again with two hands.
- Bottom of container: Place elbow against container for leverage.
- pilot chute hesitation:
- Twist while looking over the right shoulder to modify the airflow.
- Repeat over the left shoulder.
- Practice for deployment handle problems and pilot chute hesitation.
- Review premature container opening in freefall for hand deployment:
- Attempt to locate and deploy the pilot chute first.
- If the pilot chute can’t be located after two tries or if deploying the pilot chute results in a partial malfunction, cut away and deploy the reserve.
- Review student-in-tow procedures for static-line: Signal to the instructor readiness to deploy the reserve once the static line is cut.
- Practice for recognizing and responding to total and partial malfunctions (from Category A procedures).
- Review minimum cutaway altitude and reserve deployment without cutaway if necessary.
- Decide to cut away by 2,500 feet and act.
- If below 1,000 feet without a functioning canopy, deploy the reserve (will result in a cutaway on an SOS system).
- If in a canopy entanglement with another jumper below 1,000 feet and it appears the canopies cannot be separated in time for a safe landing, deploy the reserve (will result in a cutaway with the SOS system, so may not be an option).
- Both parachutes deployed:
- Biplane—do not cut away, steer the front canopy gently using toggles or leave the brakes
stowed and steer by pulling on the rear risers; leave brakes stowed on the back canopy; PLF.
- Side-by-side (two alternatives)
- side-by-side alternative one
- If the two canopies are not tangled, cut away and fly the reserve to a safe landing.
- side-by-side alternative two
- Steer the dominant (larger) canopy gently using toggles or leave the brakes stowed and steer by pulling on the rear risers.
- Leave the brakes stowed on the other canopy.
- Make a parachute landing fall on landing.
- Downplane—cut away the main canopy.
- Premature deployment in aircraft:
- Attempt to contain the open parachute and inform the instructor.
- If your parachute goes out the door, follow it immediately, before being extracted.
D. Equipment
- Parachute deployment with opportunities for malfunctions explained (actual deployment on the ground recommended)—
- lost or unrecoverable deployment handle
- impossible deployment handle extraction
- pack closure
- pilot chute hesitation
- pilot chute in tow
- premature deployment (hand deploy)
- pilot chute entanglement
- horseshoe
- bag lock
- streamer
- line-over
- fabric or line failure sufficient to interfere with control and flare
- slider hang-up
- control-line entanglement
- Review parachute retrieval after landing.
E. Rules & Recommendations
- Review the USPA Basic Safety Requirements (BSRs) on supervision and progression requirements for students.
- Review the BSRs on wind limits for students (waiverable by a USPA Safety & Training Advisor).
- Review the BSRs on minimum required deployment altitudes for students and USPA A license holders.
- Review the BSRs on drop zone requirements for students (waiverable by an S&TA) and what is considered a landing hazard.
F. Spotting & Aircraft
- Minimum, careful movement in the aircraft helps prevent premature activation.
- Runway lengths and headings (use of a compass)
- The runway heading provides a reference for direction (north, south, east, and west).
- The runway length provides a reference for judging distance from the air (in tenths of a mile for GPS and Loran).
- Winds are described by their direction of origin, said as a compass heading (for example, “The winds are two-seventy,” means the winds are blowing from the west).
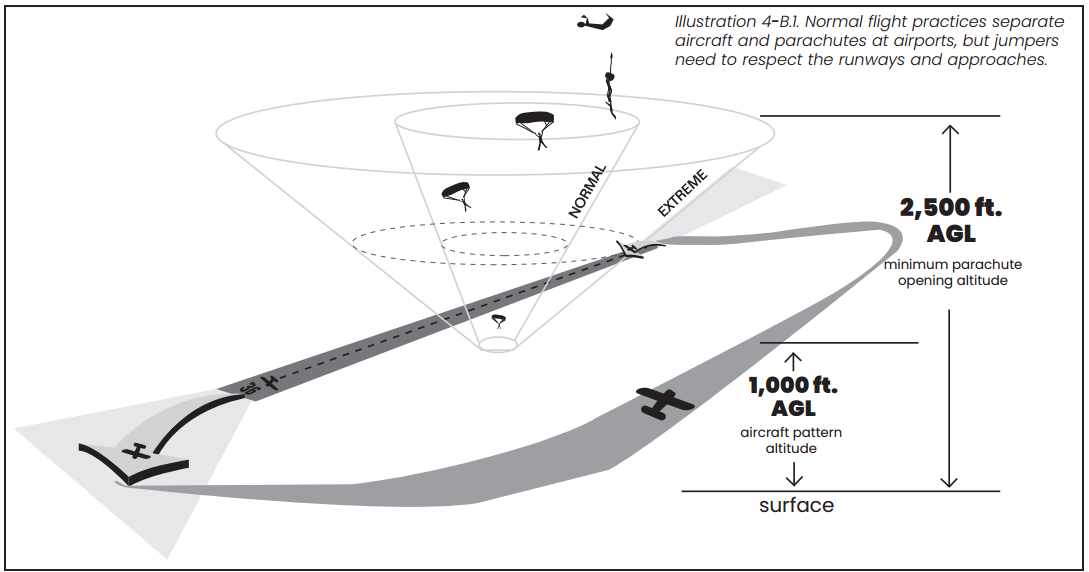
- Avoid runways and approaches, including getting clear of a runway after landing on or near one.
- Discuss local aircraft traffic approach altitudes and landing patterns and their relationship to canopy approach and landing patterns. (See the illustration below, and also refer to the illustration in FAA Advisory Circular 90-66, Appendix 3, in SIM Section 9-2.)
- Crossing the runway
- Know the airport and drop zone rules about crossing a runway.
- If allowed, look both ways and minimize the time spent on the runway.